File Upload with .NET Core and MVC - Part 3 – Validation
Previously in this blog series, you learned how to style the HTML file upload control and how to upload a file to the server. You then learned to upload additional information with the file using a view model class. In this blog post you learn to set the file upload control's dialog to just look for certain file types. You also learn how to validate the file that is uploaded to make sure only certain types are allowed to be uploaded.
Filter File Types to Upload
This blog posts builds upon the previous post where I showed you how to create a view model class to upload a file and associate information about that file. To follow along with this blog post, I would recommend you retrieve the sample from the previous blog post and open the solution file. After opening the project, copy the Views\Home\Sample2.cshtml file to a new file within the Views\Home folder named UploadAFile.cshtml. Open the Views\Home\UploadAFile.cshtml file and locate the <input type="file"> element and add an accept attribute to the element. In this attribute add a comma-delimited list of file types you want to set the default filter of the file types the File Open Dialog should display.
<input asp-for="FileToUpload"
       type="file" class="d-none"
accept=".txt,.doc,.docx,.xls,.xlsx" />
To try out this page, you need to open the Controllers\HomeController.cs file and add two new action methods as shown in Listing 1. The first method, UploadAFile(), creates an instance of the FileSystemViewModel class and passes that to the View() method so the inputs on the page are bound to the properties of the view model class. The post method UploadAFile() accepts the same view model class and calls the Save() method.
public IActionResult UploadAFile()
{
  FileSystemViewModel vm = new();

  return View(vm);
}

[HttpPost]
public async Task<IActionResult> UploadAFile(FileSystemViewModel vm)
{
  if (ModelState.IsValid) {
    if (await vm.Save()) {
      return View("FileUploadComplete", vm);
    }
  }

  return View(vm);
}
Listing 1: Add two action methods to call the file upload page.
Open the Views\Home\Index.cshtml file and add a new anchor tag below the other anchor tags already on this page as shown in the following code snippet.
<a asp-action="UploadAFile"
   asp-controller="Home"
   class="list-group-item">
  Upload a File
</a>
Try it Out
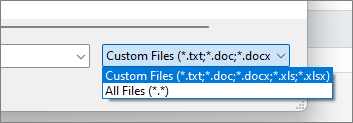
Run the MVC application and click on the Upload a File link on the home page. Click on the file upload text box to see the File Open Dialog appear. Drop-down the list in the lower right-hand corner and you should see the list of file types you can choose from based on the comma-delimited list you typed into the accept attribute as shown in Figure 1.
The accept attribute does not validate the file selected by the user, it simply sets the initial file extension filter. It is up to you to validate the file selected is a valid type after you upload it to the server. That is what you are going to do in the rest of this blog post.
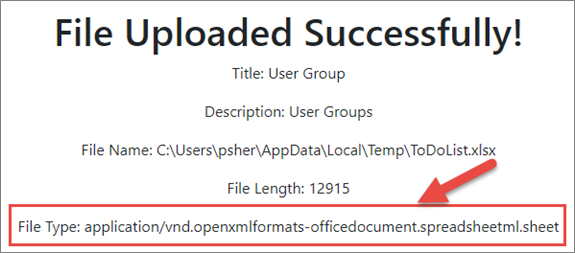
While you have the File Open Dialog open, select a Word document or an Excel spreadsheet file and click on the Open button. Click the Save button on your page and you should see a File Uploaded Successfully page displayed. Look at the File Type (Figure 2) and you will notice it is different from the file extension of the file you uploaded. The file type shown in Figure 2 was for an Excel spreadsheet that I uploaded.
Configure Valid File Types to Upload
Microsoft Office documents are assigned a type of application/vnd.openxmlformats-officedocument when they are uploaded to the server. Any image or photo is assigned image/png, image/jpg, etc. A PDF file would be uploaded with a type of application/pdf, a text file, a C# file, or a JavaScript file is assigned a type of plain/text. You are going to have to know these so you can validate the type of file the user is trying to upload on the server-side.
Instead of hard-coding the file types in the accept attribute on the web page, and hard-coding the server-side file types, I would recommend you place both these sets of file types into a configuration file. Open the appsettings.json file and add a new JSON object named "FileUploadSettings" before the other JSON objects that are already in this file.
{
"FileUploadSettings": {
  "acceptTypes": "image/*,.pdf,.txt,.doc,.docx,.xls,.xlsx,.ppt,.pptx",
  "validFileTypes": "application/vnd.openxmlformats-officedocument,image/,application/pdf,text/plain",
  "invalidFileExtensions": ".cs,.js,.vb"
  },

  "Logging": {
    "LogLevel": {
      "Default": "Information",
      "Microsoft.AspNetCore": "Warning"
    }
  },
  "AllowedHosts": "*"
}
You have three properties in this JSON object. "acceptTypes" is what you use in the accept attribute on the web page. "validFileTypes" and "invalidFileExtensions" are the properties you are going to use in a Validate() method in the view model class to ensure only a file with valid types and file extensions are being uploaded.
Add File Upload Settings Class
To use the values in the appsettings.json file, I like to map those properties to the properties in a C# class. Right mouse-click on the EntityClasses folder and add a new class named FileUploadSettings as shown in Listing 2. This class has three properties to match the three properties in the appsettings.json file. The constructor initializes each property to valid starting values.
namespace UploadVMSample.EntityClasses;

public class FileUploadSettings
{
  public FileUploadSettings()
  {
    AcceptTypes = "image/*,.pdf,.txt,.doc,.docx,.xls,.xlsx,.ppt,.pptx";
    ValidFileTypes = "application/vnd.openxmlformats-officedocument,image/,application/pdf,text/plain";
    InvalidFileExtensions = ".cs,.js,.vb";
  }

  public string AcceptTypes { get; set; }
  public string ValidFileTypes { get; set; }
  public string InvalidFileExtensions { get; set; }
}
Listing 2: Create a C# class to hold the application settings.
Inject Settings Class into Controller
Now that you have the settings in the appsettings.json file and a class to hold that data, you need to read the settings and place them into the properties of an instance of the FileUploadSettings class. Open the Program.cs file and write the following line of code just after the line of code which calls the AddControllersWithViews() method.
// Load file upload settings
FileUploadSettings settings = new();
builder.Configuration.GetSection("FileUploadSettings").Bind(settings);
builder.Services.AddSingleton<FileUploadSettings>(settings);
The above code creates a new instance of the FileUploadSettings class. It then uses the GetSection() method of the Configuration class to bind the properties in the JSON object to the matching properties in the FileUploadSettings class. It then adds a singleton of this object to the Dependency Injection engine in ASP.NET.
To have this FileUploadSettings object injected into a controller so you can use the settings, open the Controllers\HomeController.cs file and add a new private readonly variable to hold that object.
private readonly FileUploadSettings _settings;
Next, modify the constructor in the HomeController class to have the singleton of the FileUploadSettings class injected into this controller as shown below.
public HomeController(ILogger<HomeController> logger,
FileUploadSettings settings)
{
  _logger = logger;
_settings = settings;
}
Validate the File Uploaded
Business logic and data logic do not belong in the controllers of an MVC application. Instead, this logic should be in a view model class. To validate the file name uploaded, you are going to add some logic in the FileUploadViewModelBase class. Open the ViewModelClasses\FileUploadViewModelBase.cs file and add two new properties as shown in the following code snippet. The first property is a FileUploadSettings object named UploadSettings. The second property, ErrorMessage, is used to display an error message to the user if they attempt to upload an invalid file type.
public FileUploadSettings UploadSettings { get; set; } = new();
public string ErrorMessage { get; set; } = string.Empty;
To validate the file uploaded, create a method named Validate() as shown in Listing 3. This method compares the Type property in the FileInfo object against the list of valid file types and the list of invalid exentions. Take the comma-delimited list of file types in the ValidFileTypes property and convert them to a string array named validTypes. Also grab the comma-delimited list of invalid file extensions from the InvalidFileExtensions property and convert them into a string array named extensions.
The first check is to see if the FileInfo.Type value starts with any of the values in the validTypes array. If this LINQ query returns true, then it is a valid file type. However, you still need to make sure that the file is not contained in the invalid file extensions such as ".cs", ".js", ".vb", etc. C# files, JavaScript files, are sent with the file type of "text/plain", but we do not want to necessarily allow them to be uploaded to our site, so we need to limit the files uploaded to only those with the file extensions we allow. If the return value is false, the ErrorMessage property is set to an appropriate message to display to the user.
public virtual bool Validate()
{
  bool ret = false;
  string[] validTypes = UploadSettings.ValidFileTypes.Split(",");
  string[] extensions = UploadSettings.InvalidFileExtensions.Split(",");

  // Check for valid "accept" types
  ret = validTypes.Any(f => FileInfo.Type.StartsWith(f));

  if (ret) {
    // Check for invalid file extensions
    ret = !extensions.Any(f => Path.GetExtension(FileInfo.FileName) == f);
  }

  if (!ret) {
    ErrorMessage = "You are Trying to Upload an Invalid File Type";
  }

  return ret;
}
Listing 3: Validate the file uploaded against the list of valid types and file extensions.
You need to call this Validate() method from somewhere, so let's add it just before the call to the SaveToDataStoreAsync () method. You want to call it after the file information, such as the Type has been retrieved, and before you store the file. Locate the Save() method and wrap an if statement around the call to SaveToDataStoreAsync() as shown in the code below.
public virtual async Task<bool> Save()
{
  bool ret = false;

  // Ensure user selected a file for upload
  if (FileToUpload != null && FileToUpload.Length > 0) {
    // Get all File Properties
    GetFileProperties();

if (Validate()) {
      // Save File to Data Store
      ret = await SaveToDataStoreAsync();
    }
  }

  return ret;
}
Pass Upload Settings into View Model
Open the Controllers\HomeController.cs file and modify the UploadAFile() methods to fill in the UploadSettings property on the view model object.
public IActionResult UploadAFile()
{
  FileSystemViewModel vm = new()
  {
    // Set the upload settings
    UploadSettings = _settings
  };

  return View(vm);
}

[HttpPost]
public async Task<IActionResult> UploadAFile(FileSystemViewModel vm)
{
  // Set the upload settings
    vm.UploadSettings = _settings;

  if (ModelState.IsValid) {
    if (await vm.Save()) {
    return View("FileUploadComplete", vm);
    }
  }

  return View(vm);
}
Add Accept Types and Error Message to Page
Open the Views\Homes\UploadAFile.cshtml file. Instead of having the hard-coded values in the accept attribute in the <input type="file"> element, replace that with @Model.UploadSettings.AcceptTypes as shown in the code below. You also need somewhere to display the error message on the page if the user uploads an incorrect type of file. Add the <span> element into which you display the ErrorMessage property as shown in the code below.
<div class="mb-2">
  <label asp-for="FileToUpload"
    class="form-label"></label>
  <input asp-for="FileToUpload"
          type="file" class="d-none"
          accept="@Model.UploadSettings.AcceptTypes" />
  <div class="input-group">
    <button class="input-group-text btn btn-success"
            type="button"
            onclick="selectFileClick();">
      Select a File
    </button>
    <input id="fileDisplay" type="text"
            class="form-control" readonly="readonly"
            onclick="selectFileClick();" />
  </div>
<span class="text-danger">
    @Model.ErrorMessage
  </span>
</div>
Try it Out
Run the MVC application and click on the Upload a File link on the home page. Fill in the Title and Description text boxes. Click into the file upload text box to see the File Open Dialog appear. Select a valid file and click the Save button and you should get the successful confirmation page. Click the back button on your browser and select an invalid file such as a .cs or .js file and click the Save button. You should now get an error message display below the file input text box.
Summary
In this blog post you learned how to filter the File Open Dialog to show only certain file types to the user. You also learned how to create a list of valid file types and ensure the file name is validated before you attempt to store the file on your web server.
#fileupload #javascript #csharp #mvc #dotnetcore #pauldsheriff #development #programming