File Upload with .NET Core and MVC - Part 5 – Limit File Size
This blog series has shown you how to upload files using ASP.NET Core. You have learned how to style the HTML file upload control and how to upload a file to the server. You uploaded additional information with the file using a view model class. You checked for just specified file types and validated that only those types were uploaded. Finally, you uploaded images and created thumbnail images. In this blog post you are going to set a limit on how large a file can be uploaded.
Display Maximum File Upload Size
You don't want to just set a limit on the file size and not tell your user what that size is, so let's add the limit to the appsettings.json file and display that size to the user just below the file upload control. ASP.NET deals with file sizes in bytes, so that is what you are going to store in the json file. However, when you display the size to the user, you are going to use megabytes. Open the appsettings.json file and add a new property to the "FileUploadSettings" JSON object as shown in the code snippet below.
"FileUploadSettings": {
  "acceptTypes": "image/*,.pdf,.txt,.doc,.docx,.xls,.xlsx,.ppt,.pptx",
  "validFileTypes": "application/vnd.openxmlformats-officedocument,image/,application/pdf,text/plain",
  "invalidFileExtensions": ".cs,.js,.vb",
  "uploadFolder": "UploadedFiles",
  "thumbScale": 0.15,
  "maxUploadSize" : 2097152
},
Whenever you add a property to the JSON object, you should also add a corresponding property in the FileUploadSettings class to it can be automatically mapped within the Program.cs file. Open the \EntityClasses\FileUploadSettings.cs file and add a property named MaxUploadSize.
public long MaxUploadSize { get; set; }
Set a default value to this new property in the constructor of the class.
MaxUploadSize = 2097152; // 2mb limit
Create a FileHelper Class
Since you are storing bytes in the json file, you need a method to convert that to megabytes. Right mouse-click on the project and add a new folder named HelperClasses. Right mouse-click on the HelperClasses folder and add a new class named FileHelper. In this FileHelper class create an enumeration named FileSizeUnits. Create a method named ConvertSizeUnits() to which you pass the size you wish to convert. With just a little bit of math you can convert the number of bytes in your json file to either kilobytes, megabytes, gigabytes, etc.
namespace UploadVMSample.HelperClasses;

public static class FileHelper
{
  public enum FileSizeUnits
  {
    Byte, KB, MB, GB, TB, PB, EB, ZB, YB
  }

  public static string ConvertSizeUnits(long value, FileSizeUnits unit)
  {
    return (value / (double)Math.Pow(1024, (long)unit)).ToString("0") + unit.ToString();
  }
}
Add Property to Display Megabyte Value to User
Instead of writing the code in your Razor page to call the FileHelper class, add a new read-only property to the FileUploadSettings class named UploadMaxSizeInMB as shown in the following code.
public string UploadMaxSizeInMB
{
  get {
    return FileHelper.ConvertSizeUnits(MaxUploadSize, FileHelper.SizeUnits.MB);
  }
}
Modify the Validate() Method
You now need to check to ensure the user does not upload a file larger than the size specified in the json file. Open the ViewModelClasses\FileUploadViewModelBase.cs file and locate the Validate() method and add the following code just before the return ret line of code.
if (ret) {
  if (FileInfo.Length > UploadSettings.MaxUploadSize) {
    ret = false;
    ErrorMessage = $"The File you are Uploading is Too Large. It is {FileHelper.ConvertSizeUnits(FileInfo.Length, FileHelper.SizeUnits.MB)}";
  }
}
The above code checks the length of the file uploaded and if it is greater than the value set in the MaxUploadSize property the ErrorMessage property is set with a message informing the user that the file they are trying to upload is too large.
Modify Page to Display Max Size
With the property set in the view model, you can now use this value to display the maximum size of file to upload in a span just below the file input control on your page. Open the Views\UploadAFile.cshtml file and just below the <div class="input-group"> closing </div> tag, add the label shown in the code below.
<div class="mb-2">

    // FILE UPLOAD HTML HERE

    </div>
    <label class="form-text">
      The maximum file size you may upload is @Model.UploadSettings.UploadMaxSizeInMB
    </label>
  </div>
  <span class="text-danger">
    @Model.ErrorMessage
  </span>
</div>
Try it Out
Run the MVC application and click on the Upload a File link. You should see the new message appear as shown in Figure 1.
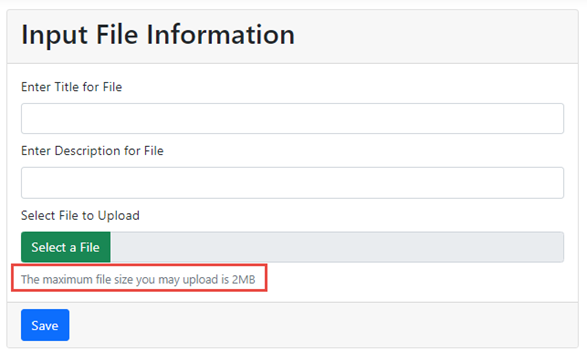
Go ahead and enter a Title and Description for a file, then attempt to upload a file from your machine that is larger than 2MB to view the error message.
Summary
In this blog post you learned to set a limit on the total file size you are going to allow the user to upload. You added a label on your screen to inform the user of the total file size they are allowed to upload. You added a FileHelper class to perform the calculation of converting bytes to megabytes.
#fileupload #javascript #csharp #mvc #dotnetcore #pauldsheriff #development #programming