In this fifth part of a series of blog posts on the WPF list box, you are going to learn to use the CollectionViewSource class in .NET to group Product data on one of the columns. The CollectionViewSource class can be created in XAML and passed parameters in order to group the product data coming from your data source. In addition, you may instantiate a CollectionViewSource class in code and change the grouping of the data based on a user selection.
Before reading this blog post, it is recommended you read my blog post Using WPF List Controls - Part 1 so you can learn about the data layer used in this blog post and review how WPF list controls work.
Grouping
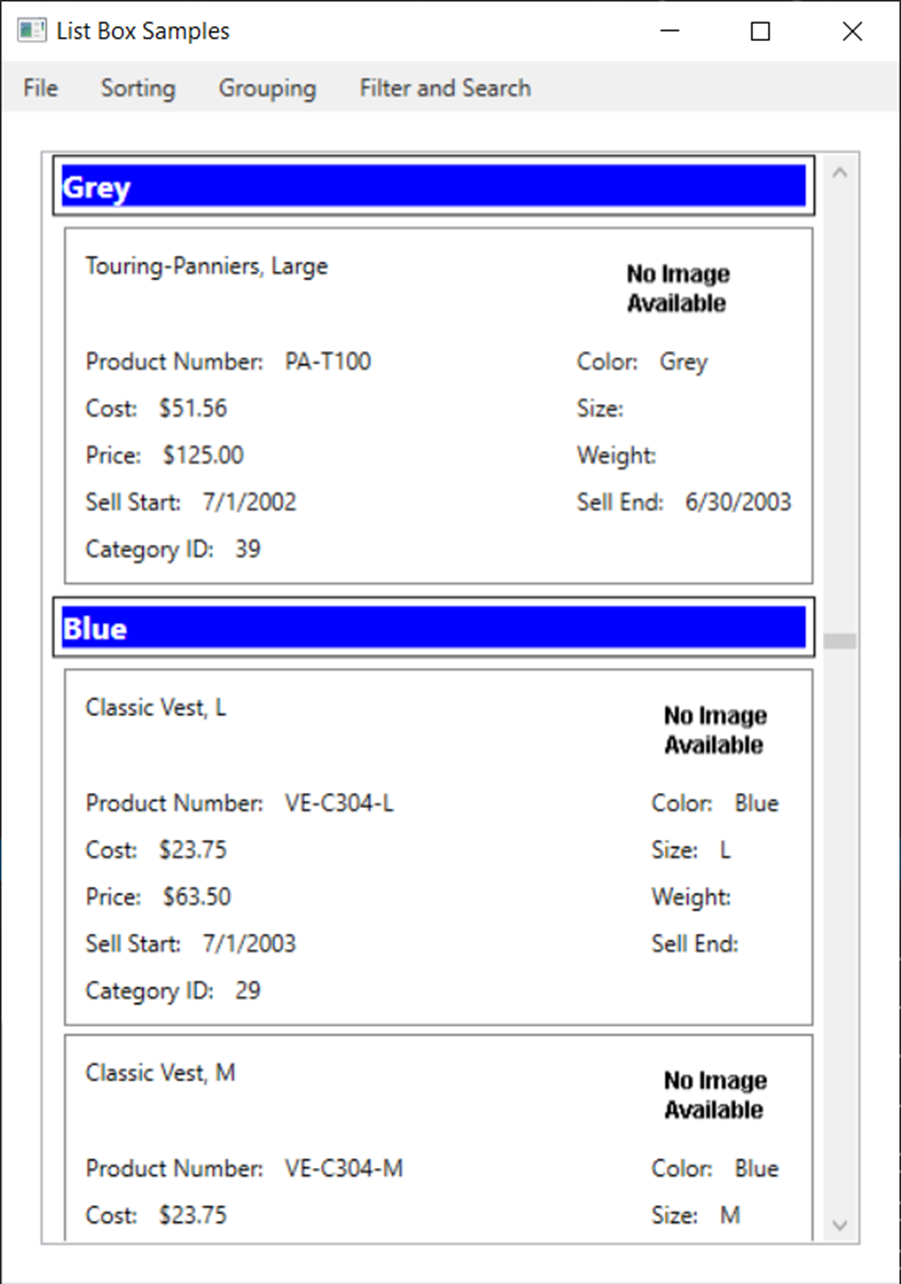
Grouping is a method in which you can take a property, or properties, from your collection of data and group the data on unique instances from that property(ies). For example, in the Product table there are a finite number of colors. You can get a distinct list of those colors (ie. Grey, Red, Blue, etc.), display those unique colors and list all products within each of those colors as shown in Figure 1.
Group Using XAML
Use the same CollectionViewSource you used in the previous blog post but add a new SortDescription on the Color property. Add a <GroupDescriptions> element just below the closing SortDescriptions element. Add a <PropertyGroupDescription> element with the PropertyName property set to "Color".
<CollectionViewSource Source="{Binding Path=Products,
   Source={StaticResource viewModel}}"
                      x:Key="ProductsCollection">
  <CollectionViewSource.SortDescriptions>
<scm:SortDescription PropertyName="Color"
                          Direction="Descending" />
    <scm:SortDescription PropertyName="Name"
                          Direction="Ascending" />
  </CollectionViewSource.SortDescriptions>
  <CollectionViewSource.GroupDescriptions>
    <PropertyGroupDescription PropertyName="Color" />
  </CollectionViewSource.GroupDescriptions>
</CollectionViewSource>
Modify the ListBox to once again use the CollectionViewSource as it's ItemsSource. Within the ListBox element add a <ListBox.GroupStyle> element to lay out how to display each Color value as shown in Figure 1. You can see there is a thin border around the color value, and the background of the value is Blue. The complete code for the ListBox is shown below.
<ListBox Grid.Row="1"
          ItemTemplate="{StaticResource ProductLargeTemplate}"
          ItemsSource="{Binding
             Source={StaticResource ProductsCollection}}">
  <ListBox.GroupStyle>
    <GroupStyle>
      <GroupStyle.HeaderTemplate>
        <DataTemplate>
          <Border BorderBrush="Black"
                  BorderThickness="1"
                  Margin="4">
            <TextBlock FontWeight="Bold"
                        FontSize="16"
                        Background="Blue"
                        Foreground="White"
                        Text="{Binding Path=Name}" />
          </Border>
        </DataTemplate>
      </GroupStyle.HeaderTemplate>
    </GroupStyle>
  </ListBox.GroupStyle>
</ListBox>
The Text property of the TextBlock control is bound to a Name property. This is not the Name property from the Product class, but the name of the Group defined by XAML.
Group Using Code
Let's once again add some RadioButton controls to this user control (Figure 2) in order to select how to group the data. You are going to add code to group the data by color and by size. Add a Tag property to each of the two RadioButton controls; set one to "Color" and one to "Size". These are the names of the columns in the Product class upon which you are going to group the data.
<GroupBox Grid.Row="1"
          Header="Grouping Options"
          BorderBrush="Black"
          BorderThickness="1">
  <StackPanel Orientation="Horizontal">
    <RadioButton Tag="Color"
                 IsChecked="True"
                 Checked="GroupTheData"
                 Content="Group by Color" />
    <RadioButton Tag="Size"
                 Checked="GroupTheData"
                 Content="Group by Size" />
  </StackPanel>
</GroupBox>
Create the GroupTheData event procedure and write the code shown below.
private void GroupTheData(object sender, RoutedEventArgs e)
{
  if (ProductList != null) {
    ICollectionView dataView = CollectionViewSource
      .GetDefaultView(ProductList.ItemsSource);

    // Change sort order
    dataView.SortDescriptions.Clear();
    dataView.SortDescriptions.Add(
      new SortDescription((sender as RadioButton).Tag.ToString(),
        ListSortDirection.Descending));
    dataView.SortDescriptions.Add(
      new SortDescription("Name", ListSortDirection.Ascending));

    // Change group order
    dataView.GroupDescriptions.Clear();
    dataView.GroupDescriptions.Add(
      new PropertyGroupDescription((sender as RadioButton)
        .Tag.ToString()));

    ProductList.ItemsSource = dataView;
  }
}
Just as you did in the previous section, clear the SortDescriptions collection, then re-add the SortDescription objects. The first one should be the column name you are grouping upon. The second can be any other property. Next, add a PropertyGroupDescription object to the GroupDescriptions collection. This grouping is from the value of the RadioButton object clicked upon. Once this CollectionView object has been created, assign it to the ItemsSource of the ListBox to have the list box redraw itself and display the data grouped and sorted in the specified manner as shown in Figure 2.
Summary
In this blog post you learned how to group data from the Product table based on color and size. You create a set of GroupDescriptions and add the properties you wish to group on. The CollectionViewSource creates a distinct list of values in each of the properties and uses those to group the rest of the data from your Product table. You may either express these GroupDescriptions in XAML, or you may create them using C#.
#wpf #listbox #pauldsheriff #development #programming