In this sixth part of my multi-part series on the WPF list box, you explore searching and filtering. If you wish to provide your user with the ability to search for data within your list box, there are a few ways to do so. Three different methods are going to be explored in this blog post; simple text searching using built-in list box functionality, build your own search method, and use the filtering on the CollectionViewSource object. The first method is easy to implement and simple for the user. The second method is ideal if you wish to allow your user to input one or many values to search upon. The third method is good if only one search field is being used.
Before reading this blog post, it is recommended you read my blog post Using WPF List Controls - Part 1 so you can learn about the data layer used in this blog post and review how WPF list controls work.
Simple Text Searching
A list box has text searching built-in by adding the TextSearch.TextPath property to the list box. The data displayed in the list box must be sorted prior to displaying it in the list box. Your user can click on the list box to give it focus, then start typing characters. The list box will automatically move to the letter in the rows of the list box.
Create an instance of your view model in the UserControl.Resources element. Use the view model as the source of the data to a CollectionViewSource element. Bind the CollectionViewSource to the Products property in the view model. Define a SortDescription on the Name property in your Product class. This causes the data to be sorted on the product name.
<UserControl.Resources>
  <vm:ProductViewModel x:Key="viewModel" />
  <CollectionViewSource Source="{Binding Path=Products,
     Source={StaticResource viewModel}}"
                        x:Key="ProductsCollection">
    <CollectionViewSource.SortDescriptions>
      <scm:SortDescription PropertyName="Name"
                            Direction="Ascending" />
    </CollectionViewSource.SortDescriptions>
  </CollectionViewSource>
</UserControl.Resources>
Next, define the list box control to use the CollectionViewSource as the source of its data. Whatever the property name that is used as the sort, set that same property name in the TextSearch.TextPath property as shown below.
<ListBox TextSearch.TextPath="Name"
         ItemTemplate="{StaticResource ProductLargeTemplate}"
         ItemsSource="{Binding
           Source={StaticResource ProductsCollection}}" />
Multiple Field Searching
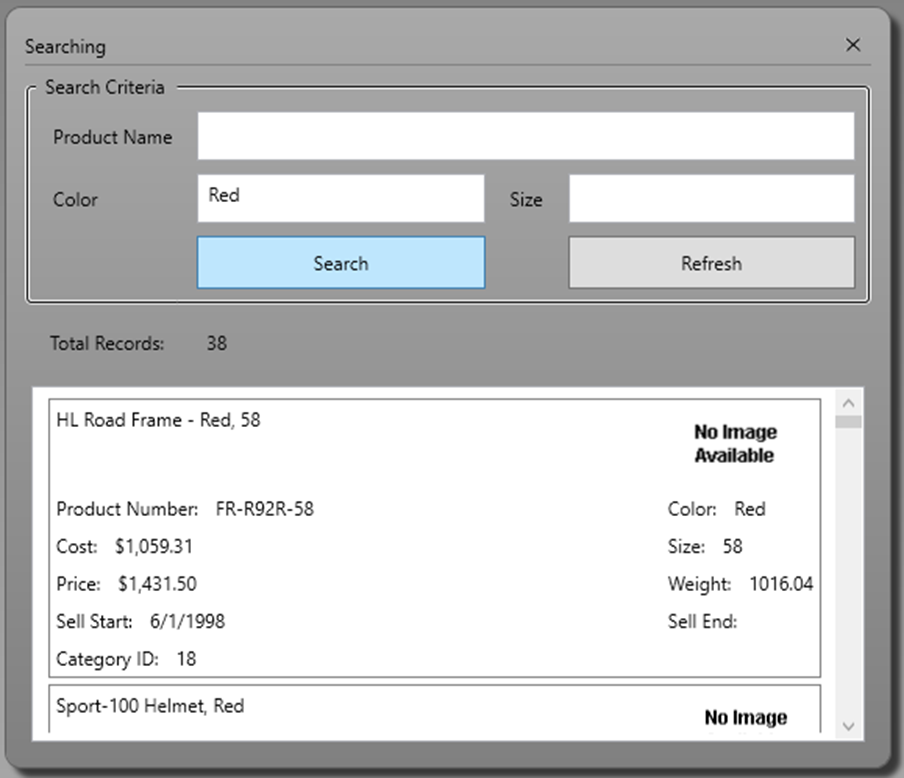
If you wish for your user to be able to enter multiple items prior to performing a search, as shown in Figure 1, you won't be able to use the prior technique as the TextPath property only accepts a single field. In the Search Criteria box shown in Figure 1, the user may enter a Product Name, a Color and/or a Size upon which to search. They may put in a partial name, color and size, they do not need to spell them out.
To create this screen, you need a ProductViewModel class with the properties shown in the following table.
| Property Name | Description |
|---|---|
|
Products |
A complete list of all products read from the Product table. |
|
SearchEntity |
A class with a property for each field the user is allowed to search upon. |
|
FilteredProducts |
A sub-set of the products based on the search criteria entered by the user. |
|
TotalFilteredRecords |
The count of the rows contained in the FilteredProducts property. |
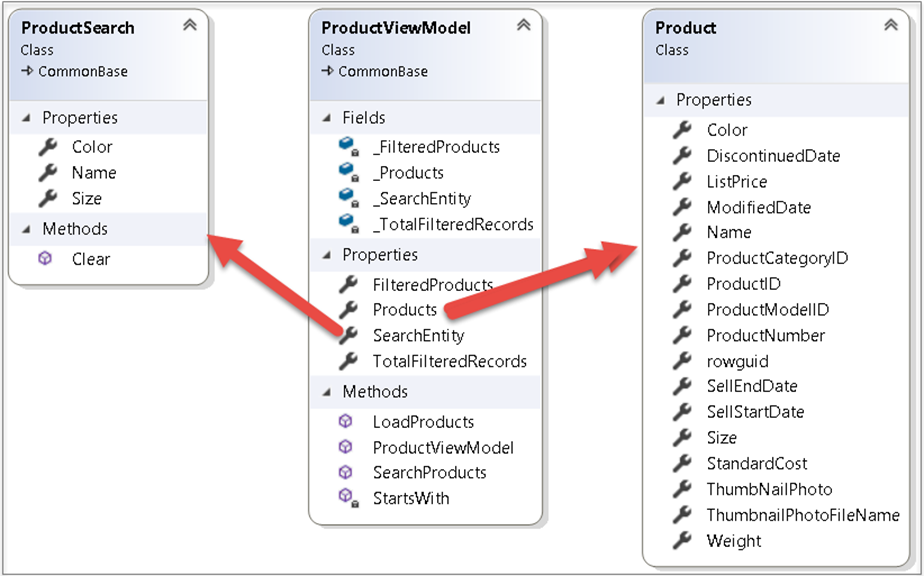
Figure 2 shows a class diagram of the ProductSearch, ProductViewModel and Product classes used in this sample.
Search XAML
Create the "Search Criteria" area shown in Figure 1 by adding the XAML code shown below.
<GroupBox Grid.Row="1"
          Header="Search Criteria"
          BorderBrush="Black"
          BorderThickness="1">
  <Grid>
    <Grid.ColumnDefinitions>
      <ColumnDefinition Width="Auto" />
      <ColumnDefinition Width="*" />
      <ColumnDefinition Width="Auto" />
      <ColumnDefinition Width="*" />
    </Grid.ColumnDefinitions>
    <Grid.RowDefinitions>
      <RowDefinition Height="Auto" />
      <RowDefinition Height="Auto" />
      <RowDefinition Height="Auto" />
    </Grid.RowDefinitions>
    <Label Grid.Row="0"
            Grid.Column="0"
            Content="Product Name" />
    <TextBox Grid.Row="0"
              Grid.Column="1"
              Grid.ColumnSpan="3"
              Text="{Binding Path=SearchEntity.Name}" />
    <Label Grid.Row="1"
            Grid.Column="0"
            Content="Color" />
    <TextBox Grid.Row="1"
              Grid.Column="1"
              Text="{Binding Path=SearchEntity.Color}" />
    <Label Grid.Row="1"
            Grid.Column="2"
            Content="Size" />
    <TextBox Grid.Row="1"
              Grid.Column="3"
              Text="{Binding Path=SearchEntity.Size}" />
    <Button Grid.Row="2"
            Grid.Column="1"
            Content="Search"
            Click="SearchButton_Click"/>
    <Button Grid.Row="2"
            Grid.Column="3"
            Content="Refresh"
            Click="RefreshButton_Click" />
  </Grid>
</GroupBox>
Just below the GroupBox control, add a StackPanel to display the total records that were found as a result of the search. Within the StackPanel control add two Label controls with the values shown below. Note the TotalFilteredRecords property. This property is created in the ProductViewModel class and is updated after searching with the total count of the filtered records.
<StackPanel Grid.Row="2"
            Orientation="Horizontal">
  <Label Content="Total Records: " />
  <Label Content="{Binding Path=TotalFilteredRecords}" />
</StackPanel>
The ListBox control is bound to the FilteredProducts property. This property is the result of searching for the data based on the criteria entered by the user.
<ListBox Grid.Row="3"
          ItemTemplate="{StaticResource ProductLargeTemplate}"
          ItemsSource="{Binding Path=FilteredProducts}" />
ProductSearch Class
The ProductSearch class contains three string properties; Name, Color and Size. A Clear() method is included on this class so when the user clicks on the Refresh button, the values bound to the ProductSearch class can be cleared. Add a property to the ProductViewModel class named SearchEntity that is an instance of this class.
public class ProductSearch : CommonBase
{
  public string Name { get; set; }
  public string Color { get; set; }
  public string Size { get; set; }

  public void Clear()
  {
    Name = string.Empty;
    Color = string.Empty;
    Size = string.Empty;

    RaisePropertyChanged("Name");
    RaisePropertyChanged("Color");
    RaisePropertyChanged("Size");
  }
}
Code Behind
In the code behind for this WPF control, add a private variable of the type ProductViewModel.
ProductViewModel _viewModel = null;
Change the constructor to assign the _viewModel field to the instance of the ProductViewModel class created by XAML.
public ListBoxSample()
{
  InitializeComponent();

  _viewModel = (ProductViewModel)this.Resources["viewModel"];
}
In the SearchButton_Click event call the SearchProducts() method on the ProductViewModel class. It is within this method you search based on the criteria filled in by the user.
private void SearchButton_Click(object sender, RoutedEventArgs e)
{
  _viewModel.SearchProducts();
}
In the RefreshButton_Click event call the LoadProducts() method. This method calls the Clear() method on the ProductSearch class to reset the search fields back to empty strings. It then retrieves all the rows from the Product table in the SQL Server database so you get fresh data and any changes made by other users.
private void RefreshButton_Click(object sender, RoutedEventArgs e)
{
  _viewModel.LoadProducts();
}
Product View Model Class
In the ProductViewModel class you need to write the SearchProducts() method to perform the searching. This method uses the LINQ method Where() to check to see if any of the three search fields have been filled in by the user. If they are, then the value is compared against each row to see if the data in the row starts with the value entered. If there is a match, that row is added to the FilteredProducts collection.
public virtual ObservableCollection<Product> SearchProducts()
{
  FilteredProducts = new ObservableCollection<Product>(
    Products.Where(p => StartsWith(ProductSearch.Name,  p.Name)
                     && StartsWith(ProductSearch.Color, p.Color)
                     && StartsWith(ProductSearch.Size,  p.Size)));

  TotalFilteredRecords = FilteredProducts.Count;

  return FilteredProducts;
}

private bool StartsWith(string searchValue, string dataValue)
{
  if (string.IsNullOrEmpty(searchValue)) {
    return true;
  }
  else if (string.IsNullOrEmpty(dataValue)) {
    return false;
  }
  else {
    return dataValue.StartsWith(searchValue,
              StringComparison.InvariantCultureIgnoreCase);
  }
}
Filter With Data Binding and Code
If you wish to filter ListBox data as the user types in a TextBox control, there are a few steps you must do.
- Add a TextBox and bind it to a property on your Window or user control
- Set the UpdateSourceTrigger on the TextBox to the PropertyChanged event
- Add a Filter event on a CollectionViewSource object
- Write code in the Filter event to select rows based on the contents in the TextBox
Modify User Control
The first step is to add a TextBox control to your user control on which you wish to perform filtering as shown in Figure 3.
Add the TextBox within a GroupBox to make it stand out from the list box where you display the filtered data.
<GroupBox Grid.Row="1"
          Header="Filter Options"
          BorderBrush="Black"
          BorderThickness="1">
  <StackPanel Orientation="Horizontal">
    <TextBlock Text="Product Name: " />
    <TextBox Text="{Binding Path=ProductFilter, UpdateSourceTrigger=PropertyChanged}"
              MinWidth="100" />
  </StackPanel>
</GroupBox>
In the Binding class for the TextBox, modify the UpdateSourceTrigger to the PropertyChanged event. By default, the TextBox control only sets the data typed in by the user into the bound property when the TextBox loses focus. However, you want the set accessor of the property to be called each time the user types in a character. Setting the UpdateSourceTrigger property on the Binding object is how you accomplish this.
The ProductFilter you are binding to, should be in the code behind of the user control you are using. The reason to put it here is because you need to call the Refresh() method on the CollectionViewSource object. The data you feed to the GetDefaultView() method must be the ItemsSource property of the ListBox you are binding to. I like to keep my view models free of any UI-specific technology, thus, I place the filter property in the code behind.
private string _ProductFilter;

public string ProductFilter
{
  get { return _ProductFilter; }
  set {
    _ProductFilter = value;
    CollectionViewSource
      .GetDefaultView(ProductsList.ItemsSource).Refresh();
  }
}
Since you are binding to a view model class for the data for your list control, but you are binding to a property on the user control, add a DataContext attribute in the XAML for your user control. This allows you to bind the TextBox to the ProductFilter property.
DataContext="{Binding RelativeSource={RelativeSource Self}}"
Add Filter Event to CollectionViewSource
In the <UserControl.Resources> element, you need a CollectionViewSource that is bound to your view model to get the initial product data, just like you have read about in the previous blog posts in this series. Add a Filter event to the CollectionViewSource. This event is fired whenever you apply the Refresh() method to the data in the CollectionViewSource. The Refresh() method is called each time the user presses a character in the TextBox because you changed the UpdateSourceTrigger to PropertyChanged.
<CollectionViewSource Source="{Binding Path=Products,
     Source={StaticResource viewModel}}"
     x:Key="ProductsCollection"
     Filter="ProductsCollection_Filter">
  <CollectionViewSource.SortDescriptions>
    <scm:SortDescription PropertyName="Name"
                          Direction="Ascending" />
  </CollectionViewSource.SortDescriptions>
</CollectionViewSource>
Make sure the ListBox is bound to the CollectionViewSource element and not the view model class as shown in the code below.
<ListBox Grid.Row="2"
  Name="ProductsList"
  ItemTemplate="{StaticResource ProductLargeTemplate}"
  ItemsSource="{Binding
       Source={StaticResource ProductsCollection}}" />
In the Filter event for the CollectionViewSource write code to ensure the e.Item property is not null. The e.Item property is filled in with a valid Product object if the Filter event is called in response to the Refresh() method. You also want to ensure that there is valid input data to filter upon from your user. Cast the e.Item property to a Product object and place it into a variable named prod.
The last line sets the e.Accepted property to a true or false value. A true value informs the CollectionViewSource object that this Product object should be included in the filtered result set. A false value tells the CollectionViewSource object to ignore this Product. Use the StartsWith() method on the Name property of the Product object and perform a case-insensitive search against the character(s) in the ProductFilter property. One item of note; the Filter method is called for each row in your collection of Product objects, so you only want to use this Filter approach when you have a small collection.
private void ProductsCollection_Filter(object sender,
   FilterEventArgs e)
{
  if (e.Item != null && !string.IsNullOrEmpty(ProductFilter)) {
    Product prod = (Product)e.Item;

    e.Accepted = prod.Name.StartsWith(ProductFilter, StringComparison.InvariantCultureIgnoreCase);
  }
}
Summary
In this blog post you learned a few different methods to search and filter the data in a list control. Simple text searching is built-in to the ListBox control and allows the user to type a character and have the ListBox jump to that character without any coding on your part. Write code in your view model class to perform multiple field searching. The CollectionViewSource class has a Filter event you may use to filter data, but it is not the most efficient for large result sets. There are other methods of searching you can employ, so choose the one that is the most appropriate for your situation.
#wpf #listbox #pauldsheriff #development #programming