jQuery Ajax Shorthand Functions
In this blog post you learn to use the jQuery shorthand functions for getting and posting data, retrieving JSON files from a server and loading HTML dynamically into the DOM.
Download Starting Projects
Instead of creating a front-end web server and a .NET Core Web API server in this blog post I have two sample projects you may download to get started quickly. If you are unfamiliar with building a front-end web server and a .NET Core Web API server, you can build them from scratch step-by-step in my three blog posts listed below.
- Create CRUD Web API in .NET Core
- Create .NET Core MVC Application for Ajax Communication
- Create Node Web Server for Ajax Communication
You can find all three of these blog posts at https://www.pdsa.com/blog. Instructions for getting the samples that you can start with are contained in each blog post. You are going to need blog post #1, then choose the appropriate web server you wish to use for serving web pages; either .NET MVC (#2) or NodeJS (#3).
Start Both Projects
After you have reviewed the blog posts and downloaded the appropriate sample projects to your hard drive, start both projects running. The first project to load is the Web API project. Open the WebAPI folder in VS Code and click on the Run | Start Debugging menus to load and run the .NET Web API project.
Open the AjaxSample folder in VS Code.
If you are using node, open the AjaxSample folder in VS Code, open a Terminal window and type npm install. Then type npm run dev to start the web server running and to have it display the index page in your browser.
If you are using the .NET MVC application, open the AjaxSample-NET folder in VS Code and click on the Run | Start Debugging menus to load and run the .NET MVC project. The index.cshtml page should now be displayed in your browser window.
Try it Out
Go to your browser for the front-end web server (localhost:3000) and you should see a page that looks like Figure 1. If your browser looks like this, everything is working for your front-end web server.
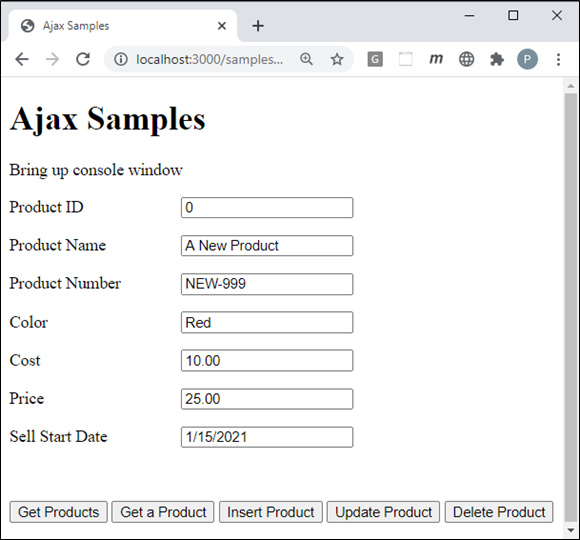
Open the Browser Tools in your browser, usually accomplished by clicking the F12 key. Click the Get Products button and you should see the product data retrieved from the Product table in the AdventureWorksLT database and displayed in your console window.
Install jQuery
If you have not already done so, you need to install jQuery into your node server project. If you are using the MVC application, jQuery is already installed, so you can skip to the next section of this blog post. Open the Terminal window in VS Code in your node server project and type the following command.
npm install jquery
After jQuery has been installed, open you index page and add a new <script> tag to use jQuery before all other <script> tags on the page.
<script src="/node_modules/jquery/dist/jquery.min.js"></script>
get() Method
Retrieving data from the server is one of the most common things you do in a web application. The $.get() shorthand method is a convenient way to retrieve data from a Web API call. Like the $.ajax() method, this method implements a promise, but, there is an optional success callback function you may use as well. You should use the .done(), .fail(), and .always() methods however. Type the code shown in Listing 1 into get() function on the index page.
function get() {
  $.get(URL)
    .done(function (data) {
      displayMessage("Products Retrieved");
      console.log(data);
    })
    .fail(function (error) {
      handleAjaxError(error);
    })
    .always(function () {
      console.log("In the always() method");
    });
}
Try it Out
Save the changes you made to the index page and go to the browser and click on the Get Products button. In the console window you should see an array of product objects appear.
Get using the Callback
Below is an example of using the success callback function. The second parameter is some optional data you might need to pass to the get Web API. The third parameter is the success callback function. Even though there is a success callback, the .done() method is still called.
function get() {
  $.get(URL, null, function (data) {
    console.log(data);
  }).done(function () {
      displayMessage("Products Retrieved");
    })
    .fail(function (error) {
      handleAjaxError(error);
    })
    .always(function () {
      console.log("In the always() method");
    });
}
Get a Single Product
You may use the $.get() method to retrieve a single product from the database. Just pass the product id on the URL to this method as shown in Listing 2.
function getProduct() {
  $.get(URL + "/" + getValue("productID"))
    .done(function (data) {
      displayMessage("Product Retrieved");
      setInput(data);
    })
    .fail(function (error) {
      handleAjaxError(error);
    })
    .always(function () {
      console.log("In the always() method");
    });
}
Try it Out
Save the changes you made to the index page and go to the browser and fill in a valid Product ID, then click on the Get a Product button. The input fields on the page should display the product information, and the product object appears in the console window.
getJSON() Method
Sometimes you might have some static .json files on your Web API server that you wish to return to the client web page. For example, you may have US State Codes, Product Categories, or other items that do not change very often, so you do not need to store them in a database. There is a method named $.getJSON() that jQuery supplies to allow you to request these static .json files. Before you can use this method, you need to modify the .NET Web API project to support the ability to locate and serve static files.
Add Static Files to Web API Project
Go to the Web API project and add a new folder named \StaticContent. Right mouse-click on this new folder and add a new file named productCategory.json. Add the code shown in Listing 3 to this new file. Restart the Web API project to allow this change to take effect.
[
  {
    "productCategoryID": 4,
    "name": "Accessories"
  },
  {
    "productCategoryID": 22,
    "name": "Bib-Shorts"
  },
  {
    "productCategoryID": 30,
    "name": "Bike Racks"
  },
  {
    "productCategoryID": 31,
    "name": "Bike Stands"
  },
  {
    "productCategoryID": 1,
    "name": "Bikes"
  },
  {
    "productCategoryID": 32,
    "name": "Bottles and Cages"
  },
  {
    "productCategoryID": 9,
    "name": "Bottom Brackets"
  },
  {
    "productCategoryID": 10,
    "name": "Brakes"
  },
  {
    "productCategoryID": 23,
    "name": "Caps"
  },
  {
    "productCategoryID": 11,
    "name": "Chains"
  },
  {
    "productCategoryID": 33,
    "name": "Cleaners"
  },
  {
    "productCategoryID": 3,
    "name": "Clothing"
  },
  {
    "productCategoryID": 2,
    "name": "Components22"
  },
  {
    "productCategoryID": 12,
    "name": "Cranksets"
  },
  {
    "productCategoryID": 13,
    "name": "Derailleurs"
  },
  {
    "productCategoryID": 34,
    "name": "Fenders"
  },
  {
    "productCategoryID": 14,
    "name": "Forks"
  },
  {
    "productCategoryID": 24,
    "name": "Gloves"
  },
  {
    "productCategoryID": 8,
    "name": "Handlebars"
  },
  {
    "productCategoryID": 15,
    "name": "Headsets"
  },
  {
    "productCategoryID": 35,
    "name": "Helmets"
  },
  {
    "productCategoryID": 36,
    "name": "Hydration Packs"
  },
  {
    "productCategoryID": 25,
    "name": "Jerseys"
  },
  {
    "productCategoryID": 37,
    "name": "Lights"
  },
  {
    "productCategoryID": 38,
    "name": "Locks"
  },
  {
    "productCategoryID": 5,
    "name": "Mountain Bikes"
  },
  {
    "productCategoryID": 16,
    "name": "Mountain Frames"
  },
  {
    "productCategoryID": 39,
    "name": "Panniers"
  },
  {
    "productCategoryID": 17,
    "name": "Pedals"
  },
  {
    "productCategoryID": 40,
    "name": "Pumps"
  },
  {
    "productCategoryID": 6,
    "name": "Road Bikes"
  },
  {
    "productCategoryID": 18,
    "name": "Road Frames"
  },
  {
    "productCategoryID": 19,
    "name": "Saddles"
  },
  {
    "productCategoryID": 26,
    "name": "Shorts"
  },
  {
    "productCategoryID": 27,
    "name": "Socks"
  },
  {
    "productCategoryID": 28,
    "name": "Tights"
  },
  {
    "productCategoryID": 41,
    "name": "Tires and Tubes"
  },
  {
    "productCategoryID": 7,
    "name": "Touring Bikes"
  },
  {
    "productCategoryID": 20,
    "name": "Touring Frames"
  },
  {
    "productCategoryID": 29,
    "name": "Vests"
  },
  {
    "productCategoryID": 21,
    "name": "Wheels"
  }
]
Next, open the Startup.cs file and add some using statements.
using Microsoft.Extensions.FileProviders;
using System.IO;
Locate the Configure() method. You need to call the UseStaticFiles() method to register the StaticContent folder you just created. Add the code shown in bold in Listing 4 to the Configure() method.
public void Configure(IApplicationBuilder app,
  IWebHostEnvironment env) {
  if (env.IsDevelopment()) {
    app.UseDeveloperExceptionPage();
    app.UseSwagger();
    app.UseSwaggerUI(c => c.SwaggerEndpoint(
      "/swagger/v1/swagger.json", "WebAPI v1"));
  }

  app.UseHttpsRedirection();

  app.UseRouting();

  app.UseAuthorization();

  // Specify a list of URLs this project will allow
  // to call it's Web API methods.
  app.UseCors(
    options => options.WithOrigins("http://localhost:3000")
      .AllowAnyMethod().AllowAnyHeader()
  );


  // Added the following to handle static files
  app.UseStaticFiles(new StaticFileOptions
  {
    FileProvider = new PhysicalFileProvider(
    Path.Combine(env.ContentRootPath, "StaticContent")),
    RequestPath = "/StaticContent"
  });


  app.UseEndpoints(endpoints => {
    endpoints.MapControllers();
  });
}
Restart the Web API project debugger to make these changes take effect.
Call the $.getJSON() Method
Open the index.html file in your HTML project and add a new function named getJSON() as shown in Listing 5.
function getJSON() {
  let url = "http://localhost:5000/StaticContent/productCategory.json";

  $.getJSON(url)
    .done(function (data) {
      displayMessage("Categories Retrieved");
      console.log(data);
    })
    .fail(function (error) {
      handleAjaxError(error);
    })
    .always(function () {
      console.log("In the always() method");
    });
}
Add a new button within the <form> where the other buttons are located as shown in the code below.
<button type="button" onclick="getJSON();">
  Get JSON
</button>
Try it Out
Save the changes you made to the index page and go to the browser and click on the Get JSON button. In the console window you should see an array of product category objects appear.
post() Method
The $.post() method can be used to send data from your web page to a Post() method in your Web API server. If your Web API call is expecting data in a url-encoded fashion, then the call to $.post() is very short. If your Web API call is expecting a JSON object, then you need to modify a couple of settings in order to use the $.post() method. To stay consistent with what you have done so far in this blog post series, you are going to keep passing a JSON object, so Listing 6 shows you how to set the contentType and the data properties on the settings object for use with the $.post() method.
function insertProduct() {
  // Get product data from user input
  let product = getFromInput();

  // NOTE: contentType default is
  //       'application/x-www-form-urlencoded; charset=UTF-8'
  // Use the settings object to set the 'Content-Type' header
  // with 'application/json' which is what the server is expecting
  let settings = {
    url: URL,
    contentType: "application/json",
    data: JSON.stringify(product)
  }

  $.post(settings)
    .done(function (data) {
      displayMessage("Product Inserted");
      console.log(data);
      setInput(data);
    })
    .fail(function (error) {
      handleAjaxError(error);
    })
    .always(function () {
      console.log("In the always() method");
    });
}
Try it Out
Save the changes you made to the index page and go to the browser and click on the Insert Product button. The input fields should update with the new product information such as the new product id generated by SQL Server.
load() Method
Sometimes you might have some dynamic HTML that you wish to insert into your web page. The jQuery .load() method can be attached to the object that is returned from the jQuery $("selector") method. The resource returned from the call to .load() is inserted into the HTML portion of the selected HTML element. For example, create a <div> just above the <form> element on the index page.
<div class="row" id="header">
</div>
Next, go over to the Web API project and create a file in the \StaticContent folder named header.html. Add the following code within this file.
<h2>Enter Product Information</h2>
Restart the Web API project to allow this change to take effect. Go back to the index page and add a method to load this partial HTML.
function loadHTML() {
  let url = "http://localhost:5000/StaticContent/header.html";

  $("#header").load(url);
}
Add a button shown below by the other buttons in your form.
<button type="button" onclick="loadHTML();">
  Load HTML
</button>
Try it Out
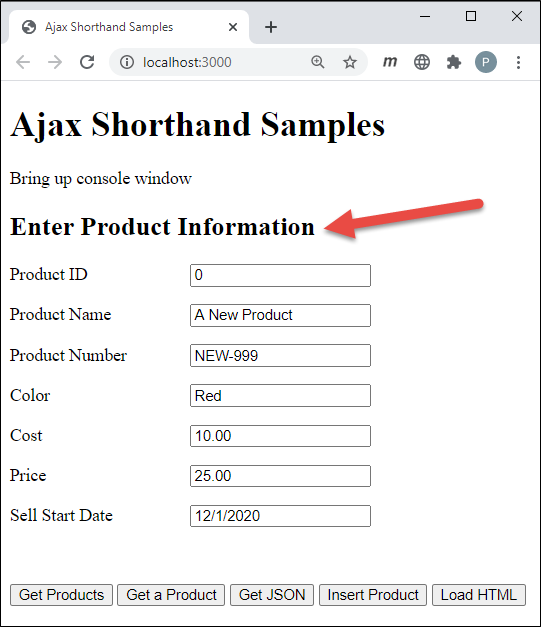
Save the changes to the index page and go back to the browser. Click on the Load HTML button and you should see the header you added in the header.html page appear above the product form as shown in Figure 2.
Add Error Handling to load() Method
There are two additional parameters you may pass to the .load() method; a JSON object or string, and a callback function that is executed when the request is complete. The callback function is supplied with three arguments; response, status and the jQuery implementation of the XMLHttpRequest object. Check the status argument to see if it is equal to "error". If it is, there was a problem retrieving the resource you requested.
function loadHTML() {
  let url = "http://localhost:5000/StaticContent/header.html";

  $("#header").load(url, null, function (response, status, xhr) {
    if (status == "error") {
      let msg = "Sorry but there was an error: ";
      displayError(msg + xhr.status + " - " +
        xhr.statusText);
    }
  });
}
Summary
Instead of just using the $.ajax() method with all of the settings you need to set, sometimes it can be easier to use the shorthand functions such as .get() and .post(). Retrieving a static .json file from the server is easily accomplished using the .getJSON() method. You can load HTML directly into a <div> or other element using the .load() method.
#jquery #ajax #javascript #pauldsheriff #development #programming